AF recently examined why it’s important to test your soil. Now we examine your options of how to test your soils.
Options?
When the rain clears and soil water table subsides, thoughts will turn to drilling spring crops and nutrient applications.
There are three key areas of soil to test: physical, chemical and biological parameters. Healthy soil has all three elements in the optimum balance for location and soil type.
Do you know your soil texture?
Soil texture is simply the proportion of sand, silt and clay-sized particles in the soil. Texture determines the ability of soil to hold and release nutrients and water, and how well roots will grow, and how easy it is to work.
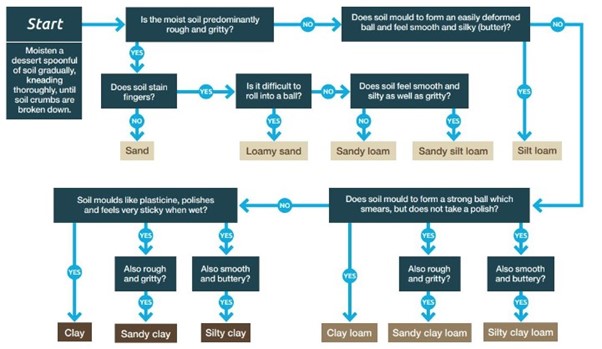
There’s a simple hand test you can do and then follow the AHDB flow diagram to determine a soil’s texture:
- Take a small sample of soil
- If dry, wet it gradually, kneading thoroughly between finger and thumb until soil crumbs are broken down
- Enough moisture is needed to hold the soil together and to show its maximum stickiness
- Follow the paths in the diagram below to determine the texture, and then review your soil texture against the Soilsensor soil texture triangle.

Now you know your soil texture you can use this to inform your management decisions.
Drainpipe test won’t drain the bank!
There is also a very simple test to measure rates of water infiltration. The test measures the rate at which water can infiltrate into soil. It is an indication of worm activity and root channels in your soil.
Equipment:
- 20cm length of 10cm drainpipe
- Hammer and block
- Timer
- 5 litres of water
Method:
- Protecting the pipe with the block of wood, hammer the pipe halfway into the ground leaving 10 cm above the ground
- Pour in water to the top
- Start the timer immediately and stop when all the water has drained into the soil
- Repeat at several locations
- After the test, check for any compaction in the soil by digging next to the test area
For soil in good health, the water should drain away within 2 to 5 minutes for light or medium soils. A heavy clay soil with poor structure could take 20 minutes or longer.
Biological soil tests
Earthworms are useful indicators of soil condition. Counts from several fields over several years or crop rotations can indicate long-term trends in soil condition.
Earthworms are impacted by pH, waterlogging, compaction, tillage, rotation, and organic matter management. They physically engineer the soil and help with carbon cycling, water infiltration and plant productivity.
The best time to count worms is early spring, or after the soil has had a good soaking in the autumn. The ultimate time is when it is warm and after rain.
When assessing earthworm numbers it is important to take 7-10 samples per field per field. Comparisons between cultivated parts of the field and margins are also advisable.
Equipment:
- Spade
- Pot or jar
- Bottle of water
- Mat
- Earthworm identification guide (Imperial College, London guide is here.)
- Notebook/tablet to record results
Method:
- Dig a soil pit (20cm x 20cm x 20cm) and place soil on mat
- Hand-sort the soil, placing each whole earthworm into the pot/jar
- Count and record the total number of earthworms
- Separate earthworms into adults and juveniles
- Return juveniles to the soil pit
- Count and record the number of each type of adult earthworm
- Return earthworms to the soil pit and backfill with soil
- Repeat steps 1-7, until 10 soil pits per field have been assessed
Identifying an adult earthworm:
- Adult earthworms have a clearly developed saddle (reproductive ring, shown in the image below) and juveniles do not
- Do not rely only on size to determine if a worm is an adult, as different types can be adult at between two and fifteen centimetres in length.
Seeing plenty of earthworms is always good, and it is especially encouraging if you have a number of different types, as each will indicate specific soil properties such as carbon capture, moisture retention, nutrient retention and so on.
pH and nutrient testing
AF specialist Josh Joachim advises that the on-farm pH and nutrient tests that you can buy through the AF Crop Inputs team perform as well, and often better, than lab tests. We can arrange lab tests for Members as well, and for SFI action SAM 1 this is a requirement.
But for every day on-farm testing, get in touch with your your AF Crop Inputs team by email to cropinputs@af.farm or call 01603 881 906, and they will advise the best test for you depending on your requirement and your geography. AF specialists can also then help plan your nutrient inputs for the coming season.
Get testing!
There is no need for us to preach to Members about the importance of soils, but there is a danger that you feel bewildered by the options for testing, protecting and enhancing your soils. Simple tests like those explained here will help you determine your soil conditions across fields, and inform decisions on how you approach sustaining or improving your soil health.